
If you’ve ever wanted to automatically generate AI images using ChatGPT (OpenAI API) within n8n, this guide walks you through the exact workflow setup. We’ll use HTTP Request nodes, Google Drive integration, and Convert to File nodes to build a complete image creation and editing pipeline — all inside n8n.
How This n8n AI Image Generation Workflow Works
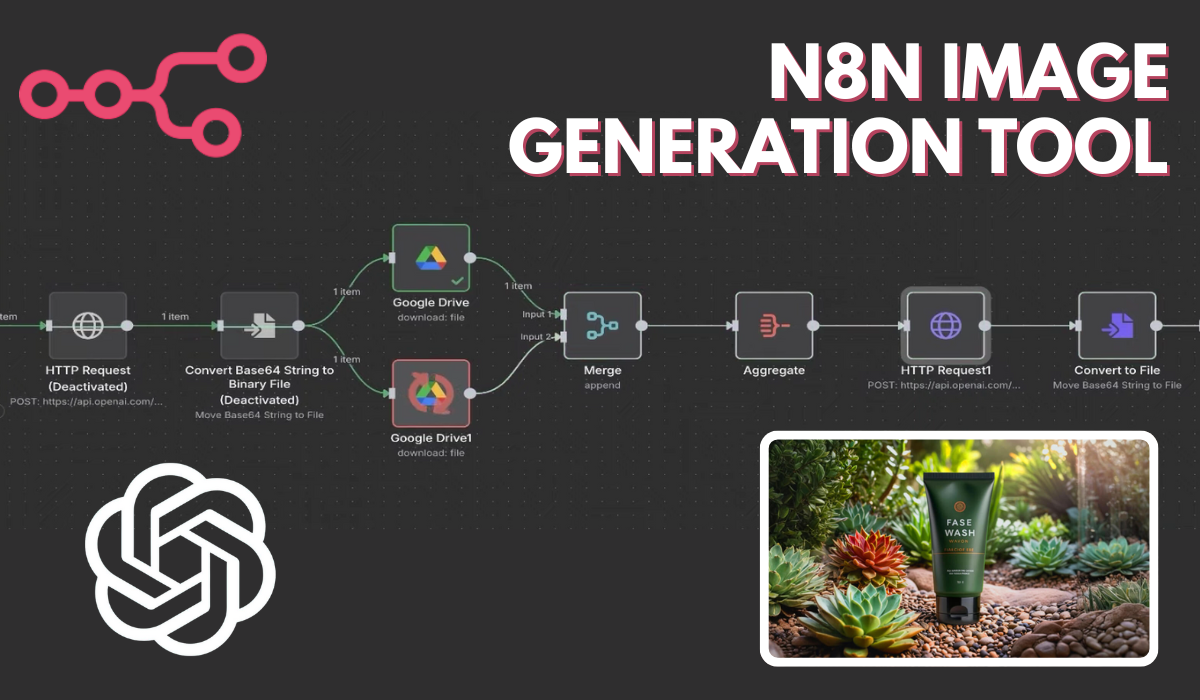
This n8n workflow connects OpenAI’s image generation API with automation nodes to create and edit images based on text prompts. It starts with a Manual Trigger, sends a prompt to ChatGPT (OpenAI API) through an HTTP Request, and receives a base64 image response. That image is then converted into a binary file, while additional reference images are fetched from Google Drive for editing. Finally, the edited images are processed and saved, completing an automated image creation pipeline — all without writing a single line of code.
🔧 Prerequisites
Before you begin:
- An n8n account (self-hosted or cloud)
- An OpenAI API key
- Access to Google Drive API (for downloading or uploading reference files)
🪜 Step-by-Step ChatGPT Image Workflow Setup
🧩 Step 1: Log into Your n8n Instance
Start by logging into your n8n dashboard. You’ll see an empty workflow canvas where we’ll build the automation.
⚙️ Step 2: Add a Manual Trigger Node
- Add the first node “Manual Trigger”.
- This allows you to manually start the workflow by clicking ‘Test workflow’ inside n8n.
Or just Go to “Workflows” → click “Import” → upload the JSON Template
Download JSON n8n Automation File: Click Here
🌐 Step 3: Add an HTTP Request Node for OpenAI Image Generation
- Add a new node: HTTP Request
- Set Method:
POST - URL:
https://api.openai.com/v1/images/generations - Add Header:
Authorization: Bearer <API_KEY>
- In the Body Parameters, set:
model: gpt-image-1prompt: A children’s book drawing of a veterinarian using a stethoscope to listen to the heartbeat of a baby otter.
This node sends your text prompt to OpenAI’s image generation endpoint.
🖼️ Step 4: Convert the Image Response to Binary File
- Add Convert to File node
- Operation:
toBinary - Source Property:
data[0].b64_json
This step decodes the base64 image data returned by OpenAI into a usable image file.
🗂️ Step 5: Add Google Drive Download Nodes
To include reference or mask images for editing:
- Add two Google Drive (Download) nodes:
- One for Lush1.jpeg
- One for Lush2.png
You’ll authenticate your Google Drive account, then select files via their IDs:
1D8OT0ef-MqEXjOjFrBo_IU4IXDVV9ZLs
12WZ2GKBR5aSQZ3ZeorQmnHzHS6VdHl3U
🔗 Step 6: Merge the Two Google Drive Nodes
Use the Merge Node to combine outputs from both downloaded images into one data stream.
- Operation:
Merge - Mode:
Pass through
🧰 Step 7: Aggregate the Data
Add an Aggregate Node to combine all image data.
- Operation:
aggregateAllItemData - Enable Include Binaries
🪄 Step 8: Send a Second HTTP Request for Image Editing
Now add another HTTP Request Node (name it HTTP Request 1).
- Method:
POST - URL:
https://api.openai.com/v1/images/edits - Headers:
Authorization: Bearer <API_KEY>
- Body Parameters:
model: gpt-image-1prompt: Generate a photorealistic image of a gift basket on a white background labeled "Relax & Unwind" with a ribbon and handwriting-like font, containing all the items in the reference picturesimage[]: Binary data inputs from Google Drive images
This node uses your uploaded reference images to edit or modify existing visuals using OpenAI’s image editing API.
💾 Step 9: Convert Edited Image to File
Finally, add a Convert To File (Binary) node again:
- Operation:
toBinary - Source Property:
data[0].b64_json
This converts the edited image response into a downloadable format.
🧮 Step 10: Test the Workflow
Click Execute Workflow → Test
Once complete, you’ll see generated image outputs in the Binary tab of your node.
This ChatGPT Image Workflow in n8n allows you to automate creative image generation, editing, and storage — all with zero manual work.
Whether you’re building AI-powered design tools or automating content creation, this workflow saves hours and scales easily.
ALSO READ:
FAQs
Can I generate images with ChatGPT using this workflow?
Yes. The OpenAI Images API (/v1/images/generations) lets ChatGPT (via API) generate images from text prompts.
What is the purpose of the Convert to File node?
It converts base64 image data returned by OpenAI into binary image files usable in later steps or exportable.
Can I use this workflow for bulk image generation?
Yes — just loop multiple prompts through the same workflow using Split In Batches or For Each nodes.
Is this workflow beginner-friendly?
Absolutely. Even if you’re new to n8n, you can replicate this setup following the visual step-by-step structure.