This guide shows how to create your own Facebook Ads Spy Tool using n8n, a no-code automation platform. With this tool, you can scrape Facebook ad data, analyze the results using AI models, and get a complete summary of each ad — including text, images, and videos — all added neatly into a Google Sheet.
You can download the ready-made JSON template down below from this article and import it directly into your n8n workflow editor to get started right away.
What This Workflow Does
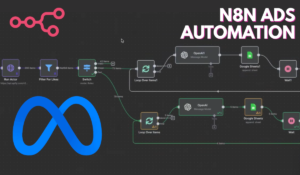
The Facebook Ads Spy Tool automatically:
- Scrapes the Facebook Ads Library for live ads using Apify API
- Filters out low-performance ads based on their like count
- Identifies whether an ad contains text, images, or videos
- Analyzes text ads using GPT-4.1, image ads using GPT-4O, and video ads using Gemini
- Summarizes each ad and rewrites its copy for inspiration
- Saves all results neatly into a Google Sheets database
Let’s walk through how this automation works step-by-step.
Step 1: Log Into n8n and Import the Template
Start by logging into your n8n dashboard.
Download the provided JSON file and import it into your workspace.
Click on “Import Workflow” and upload the file.
Once done, you’ll see all the nodes already connected.
Step 2: Add API Keys
Before running the workflow, integrate your accounts and add credentials:
- Apify API Key: Used to scrape ads from Facebook Ads Library.
- Gemini API Key: Required to analyze videos.
- OpenAI API Key: Used for ad text and image analysis.
- Google Drive and Google Sheets Credentials: To store files and append the analyzed data.
You can add all API keys and credentials from the Credentials Manager in n8n settings.
Step 3: Add the “Manual Trigger” Node
This node allows you to start the workflow manually. Simply press Execute Workflow whenever you want to collect new data from Facebook Ads.
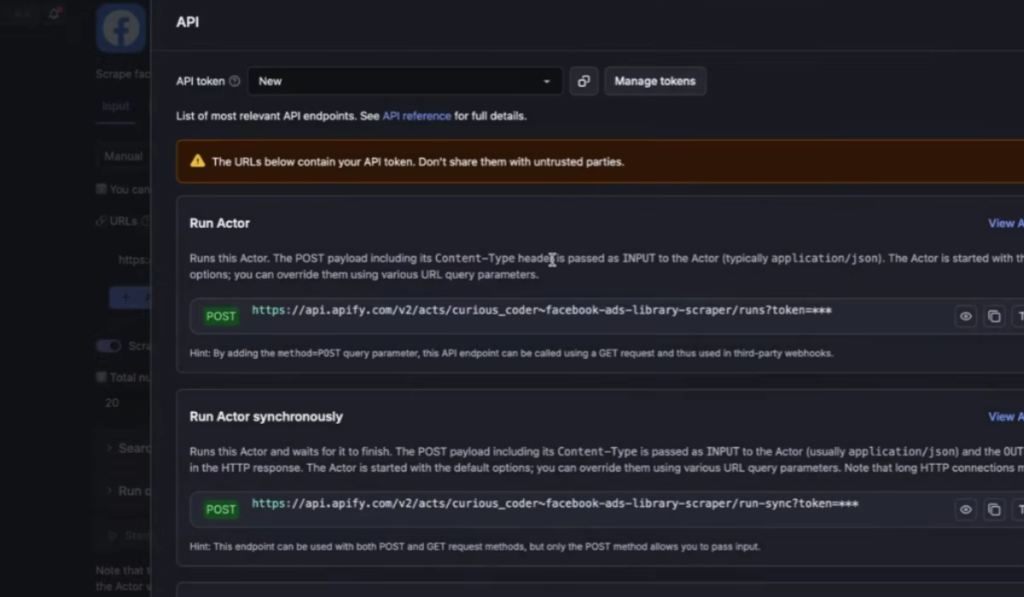
Step 4: Run the Facebook Ad Library Scraper
This node connects to Apify.
It sends a request to the Facebook Ads Library to scrape active ads using your search keyword — for example, “AI Automation.”
You can edit this keyword in the node’s settings to target your niche.
Customize:
- Change “q=%22ai%20automation%22” to your desired keyword (e.g., “fitness supplement,” “marketing agency”).
- Adjust the “count” field to decide how many ads to fetch.
Step 5: Filter for Likes
Next, the Filter for Likes node removes ads with fewer than a few hundred likes.
This helps you focus only on high-performing ads.
You can change the filter number (default is 1000) in the settings if you want broader results.
Step 6: Categorize the Ads (Switch Node)
Now that you have ad data, the Switch node separates the ads into three types:
- Video Ads
- Image Ads
- Text-Only Ads
This distinction is important because each type goes through a different analysis flow later.
Step 7: Loop Over Each Ad Type
Each ad category is processed one by one:
- Loop Over Video Ads
- Loop Over Image Ads
- Loop Over Text Ads
These loops ensure each ad is processed in batches and not all at once, which keeps the system stable.
Step 8: Process Video Ads
a) Download Video
The “Download Video” node downloads the ad video from the Facebook library.
b) Upload to Google Drive
Next, “Upload Video to Drive” temporarily stores the video file for analysis.
c) Start Gemini Upload Session
Using Gemini API, the workflow begins uploading the video for detailed analysis.
d) Upload Video to Gemini
The “Upload Video to Gemini” node sends the actual video data for processing.
e) Analyze Video with Gemini
Gemini observes the video’s visuals, tone, and content. It then produces a written summary and insight into the ad.
f) Output Video Summary
OpenAI’s GPT-4.1 rewrites and enhances the summary to extract key points, creative insights, or ad strategies.
g) Save to Google Sheets
Finally, all summarized information — including page name, video summary, rewritten ad copy, and ad link — is added to your connected Google Sheet.
Step 9: Process Image Ads
a) Analyze Image
GPT-4O analyzes the image ad deeply — describing visual elements, colors, emotions, and focus areas.
b) Output Image Summary
GPT-4.1 then rewrites and organizes the ad’s insight text, turning it into a comprehensive creative analysis.
c) Save to Google Sheets
The processed summary, rewritten copy, and image prompt details are appended into your “Ads” sheet in Google Sheets.
Step 10: Process Text Ads
a) Output Text Summary
This step uses GPT-4.1 to analyze the ad’s caption text from the Facebook dataset.
It produces two important outputs:
- Summary – what the ad is about and who it targets
- Rewritten Ad Copy – an improved or repurposed version for new ideas
b) Add to Google Sheets
All text ad results are stored in your Google Sheet under the type “text.”
Step 11: Add Optional Delay (Wait Nodes)
The Wait nodes help space out the operations between each action to keep everything stable.
This prevents overloading APIs or hitting rate limits.
These wait steps are already included, so you can leave them as default.
Step 12: Review Results in Google Sheets
Once the workflow finishes, open your Google Sheet (linked in the node setup).
You’ll find a clean, organized dataset including:
- Ad type (video, image, text)
- Page name
- URL
- Summary
- Rewritten copy
- Visual or video prompt
This sheet becomes a valuable library for your marketing research or creative inspiration.
Step 13: Automate Regular Runs (Optional)
To continuously update your ad spy library, you can schedule this automation.
Use the Cron Node in n8n to make it run daily or weekly — so new ads are automatically scraped and analyzed every time.
Download the JSON Template
You can download the complete n8n Facebook Ads Spy Tool JSON file from this article and import it directly into your n8n editor.
It includes all nodes and pre-set configurations discussed above.
Download JSON File: Click Here
Why This Tool Is Useful
- Saves hours of manual research inside the Facebook Ads Library
- Helps you discover what’s working for competitors
- Lets you repurpose or analyze successful ad formats
- Stores results neatly for training, clients, or future projects
This automation works perfectly for digital marketers, PPC agencies, and freelancers who want to make smarter ad decisions using data.
Suggested Improvements
Once you’ve tested the basic version, try adding:
- Email or Slack notifications for new trending ads
- Automatic visualization dashboards in Looker Studio
- Ad cost or engagement metrics (if available through APIs)
ALSO READ:
Final Thoughts
In just a few minutes, you’ve built a complete Facebook Ads Spy System using n8n that automatically scrapes, filters, analyzes, and organizes ad intelligence.
You can expand it to include other ad platforms — like TikTok, Instagram, or YouTube — by changing the API source nodes and updating prompts.
This setup not only reveals the best-performing ads but also turns competitive content into reusable creative ideas for your business or clients.
FAQs
What is a Facebook Ads Spy Tool?
It’s a workflow that automatically collects and analyzes active Facebook ads so you can study competitor marketing strategies and top-performing creatives.
Do I need coding knowledge to build this n8n workflow?
Not at all. It’s a no-code setup — all integrations are visually connected using drag-and-drop nodes.
What do I need before running the workflow?
You’ll need API keys for Apify, OpenAI, Gemini, and your Google accounts for Drive and Sheets.
Can I use this spy tool for my ad agency?
Yes. It helps marketing teams analyze and repurpose high-performing ads for improving campaign strategies.
How can I get the n8n workflow template?
You can download the JSON template directly from this article and import it into your n8n workspace with one click.